Let It Flow, Let it Flow, Let it Flow
‘Cause you’re hot, then you’re cold
You’re yes, then you’re no
You’re in, then you’re out
You’re up, then you’re down
You’re wrong when it’s right
It’s black, and it’s white
— Katy Perry
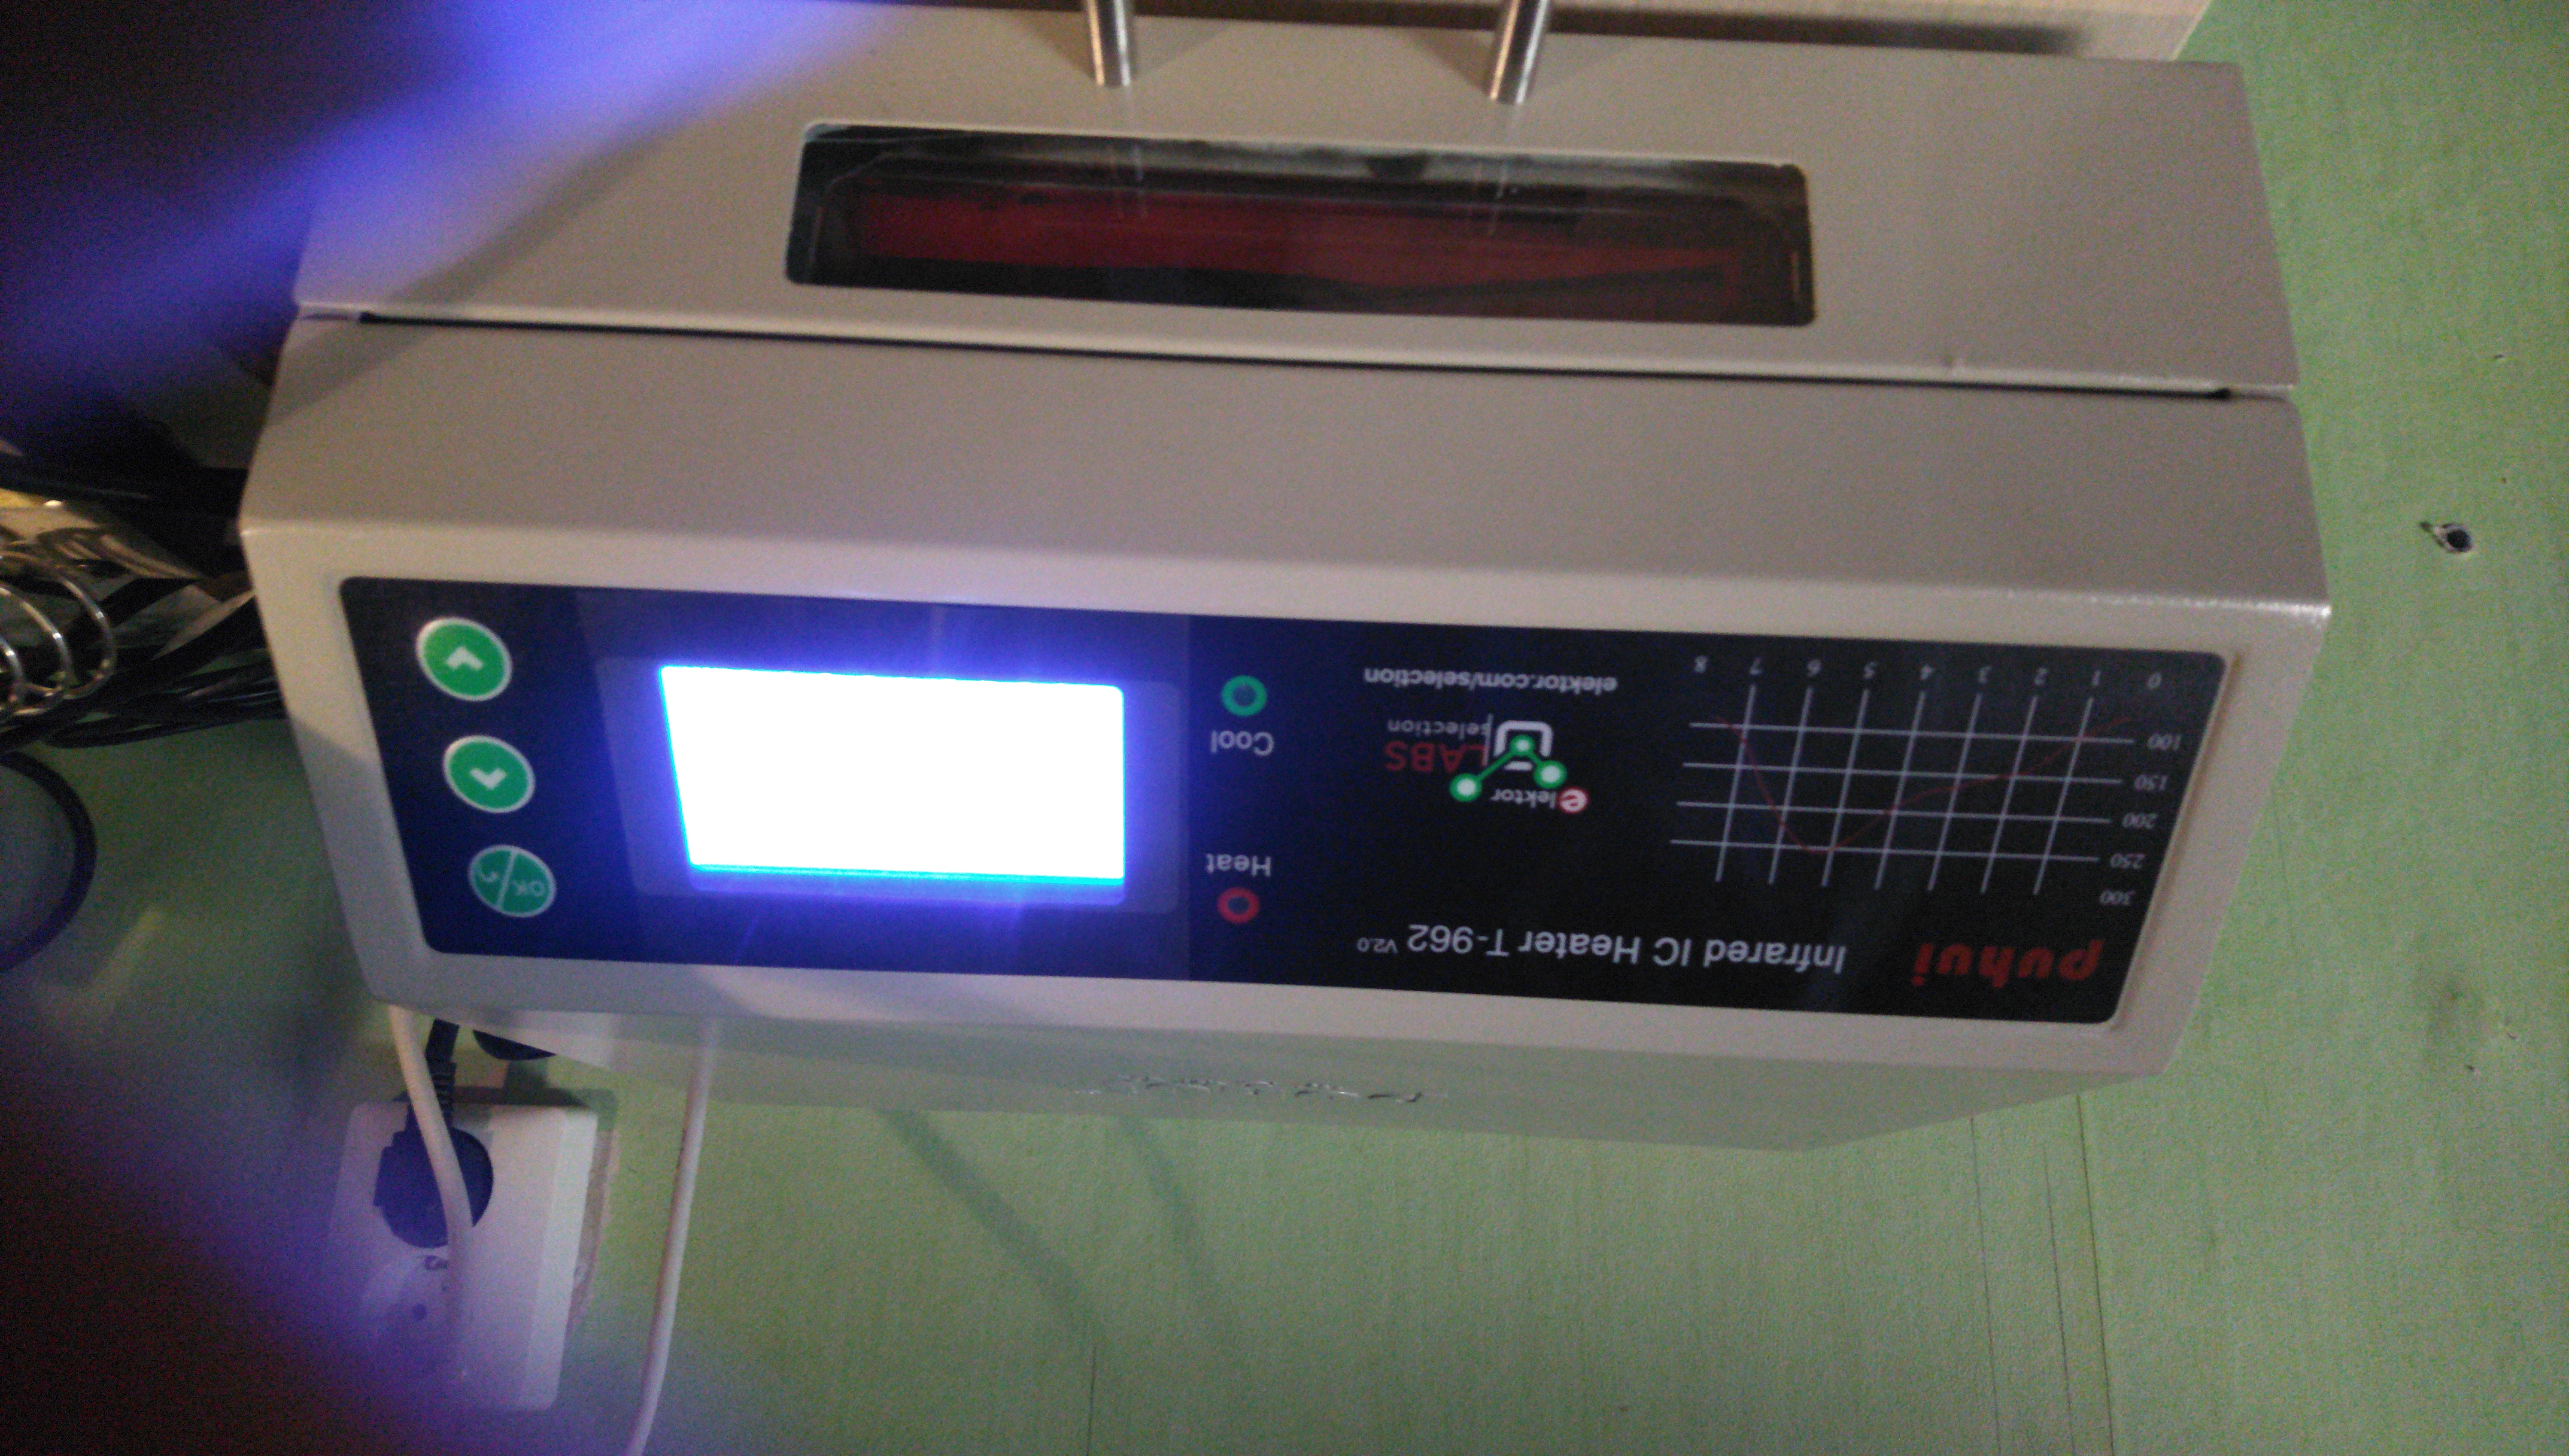
In this post I will share my experience with the Elektor1 branded T-962 V2.0 reflow oven. Spoiler: I wasn’t too pleased with it. Regardless of my opinions about the product, it is not my intention to throw shade on Elektor with this post. Their products are generally of good quality and their customer service department were friendly and helpful when I reached out to them. In the end however, the product disappointed.
I invested quite some time in trying to get the oven to work and found some useful information about how to communicate with it from a Linux system. For that reason I felt like sharing my experience. I may have just been unlucky with my T-962 and yours may be perfectly fine, so don’t be afraid to give it a try. If you want to program your Elektor T-962 from a Linux box you might find something of interest below.
Better Baking?
After promising myself never to hand-solder a large batch of circuit boards again, I considered the option of using a small reflow oven. The initial idea was a DIY solution but upon reflection I realized that would add another item to my ever growing project backlog. With that in mind, buying an off-the-shelf reflow oven seemed like the sensible thing to do. I choose the well known T-962 oven.
The T-962: lauded for its attractive price point and functionality, but not so much for its build quality and electrical safety. These ovens are known for being build using masking tape to hold the thermal insulation in place (said tape will go up in smoke the first time the device is used) and often without proper protective earthing.
There are many online guides for improving the original T-962 but there also exists an improved version. Dutch electronics publisher Elektor sells a version with all the upgrades already installed. The device is produced by the Chinese company Puhui2 and is being sold by Elektor with their logo on the front panel. It is available from their web shop. I decided to order one for my home workshop.
The T-962 V2.0 comes with a serial port to upload two custom reflow profiles to the device. The device ships with a USB flash drive that contains a spreadsheet to convert a temperature profile to a series of hexadecimal numbers that can then be copied to a serial communication application (also on the flash drive). That in turn communicates the temperature data to the device. Only the problem (for me anyway) was that this application runs on Windows while I run GNU Linux on all of my computers.
Talk to the Hand
Because the oven isn’t listening…
I did a couple of internet searches to learn about the communication protocol for the Elektor T-962 V2.0 (which was said do differ from the original T-962). I didn’t manage to find and answer and eventually descended to prompting an AI agent to do the work for me. It confidently gave me the wrong answer.
The oven supposedly expects text-based serial data and always responds with either an ‘ACK’ (on success) or an ‘ERR’ (on failure). However, regardless of what I tried to feed it, the oven wouldn’t respond. I checked the port settings and wiring, which all seemed in order. A quick look at the signals with my oscilloscope revealed a perfectly clean, 9600 Baud RS-232 signal. But no response still.
The serial application that came with the device wouldn’t run in Wine or on ReactOS and I ended up installing Windows 10 in Virtual Box to run it. To spy on the outgoing data, the socat3 tool came in handy. Running socat -d -d pty,raw,echo=0 pty,raw,echo=0 creates two character devices (in my case /dev/pts/1 and /dev/pts/2). One of those can mimic a serial port for the virtual machine by filling its path into the serial port settings page and setting the port mode to Raw file. In a second terminal window the data that the virtual machine sends to its serial port can be sniffed by the ever so helpful cat4: cat /dev/pts/1 > logfile (with logfile being the file to log the data to). This trick only snoops outbound traffic, but it’s good enough to get an idea of how the communication is initiated.
A look at the contents of the log file quickly made clear that the oven speaks Binary. Not ASCII. After passing the captured binary data to hexdump5, it became obvious what the serial com app actually does. Let’s have a look at it.
The hexadecimal numbers below were generated by the spreadsheet:
|
|
This is what hexdump had to say about the data sent to the serial port:
|
|
It’s not hard to see the similarities between the two.
Luckily, the GNU toolbox comes with everything we need to convert the temperature profile to something the oven can understand. In fact, you don’t actually need the serial communication tool that ships with the oven. Just paste the hexadecimal numbers from the spreadsheet into a text file, for example, profile.txt. Then run that file through awk6 and pass the output to the serial port (/dev/ttyUSB0 in my case, but it may differ on your system).
|
|
This command reads the hexadecimal values from the file one by one, converts them to binary and then sends the data on the serial port. Compared to a GUI application this command line trick may seem awkward, but at least your not dependent on third party tools.
I gave this a try and it fed the data nicely to the oven, which then gave a satisfied beep and showed the temperature profile on its display. The oven does send a binary acknowledgement but this command line hack is a quick and dirty approach that’s too impatient to wait for a response. The beep suffices for now.
A look under the hood of the spreadsheet tool gave another bit of insight about the protocol. The packet starts with a five byte fixed header. After that the temperature data follows. The oven expects a data point for every 5 second interval of the profile and the sequence must be terminated with a null character.
The temperature profile send to the device is offset by -25 degrees Celsius with respect to the actual profile. Temperatures below 50 degrees are not allowed (the oven won’t accept them). Surprisingly, the spreadsheet tool takes a data point for every 30 seconds and interpolates the gradient between two points to generate data points at 5 second intervals. The spreadsheet in effect reduces the reflow profile resolution.
The T-962 allows for two user-defined profiles to be stored, Wave 7 and Wave 8. To differentiate between the two, the most significant bit for each data point is either set (for Wave 7) or cleared (for Wave 8).
In a somewhat cryptic symbolic description the data would look like this:
|
|
With T [n] being an array with the temperature data points and W the value to be set to the MSB (0x80 for Wave 7 or 0x00 for Wave 8).
No State of Flow
With the oven now willing to listen to the computer it was time to start baking. I bought myself some solder paste, acquired the datasheet and started filling out a spreadsheet to convert the data to Ovenish.
I opted for Chip Quick TS391LT7 which is a low temperature paste. The datasheet advises the following profile (note that, annoyingly, the horizontal axis is non-linear).
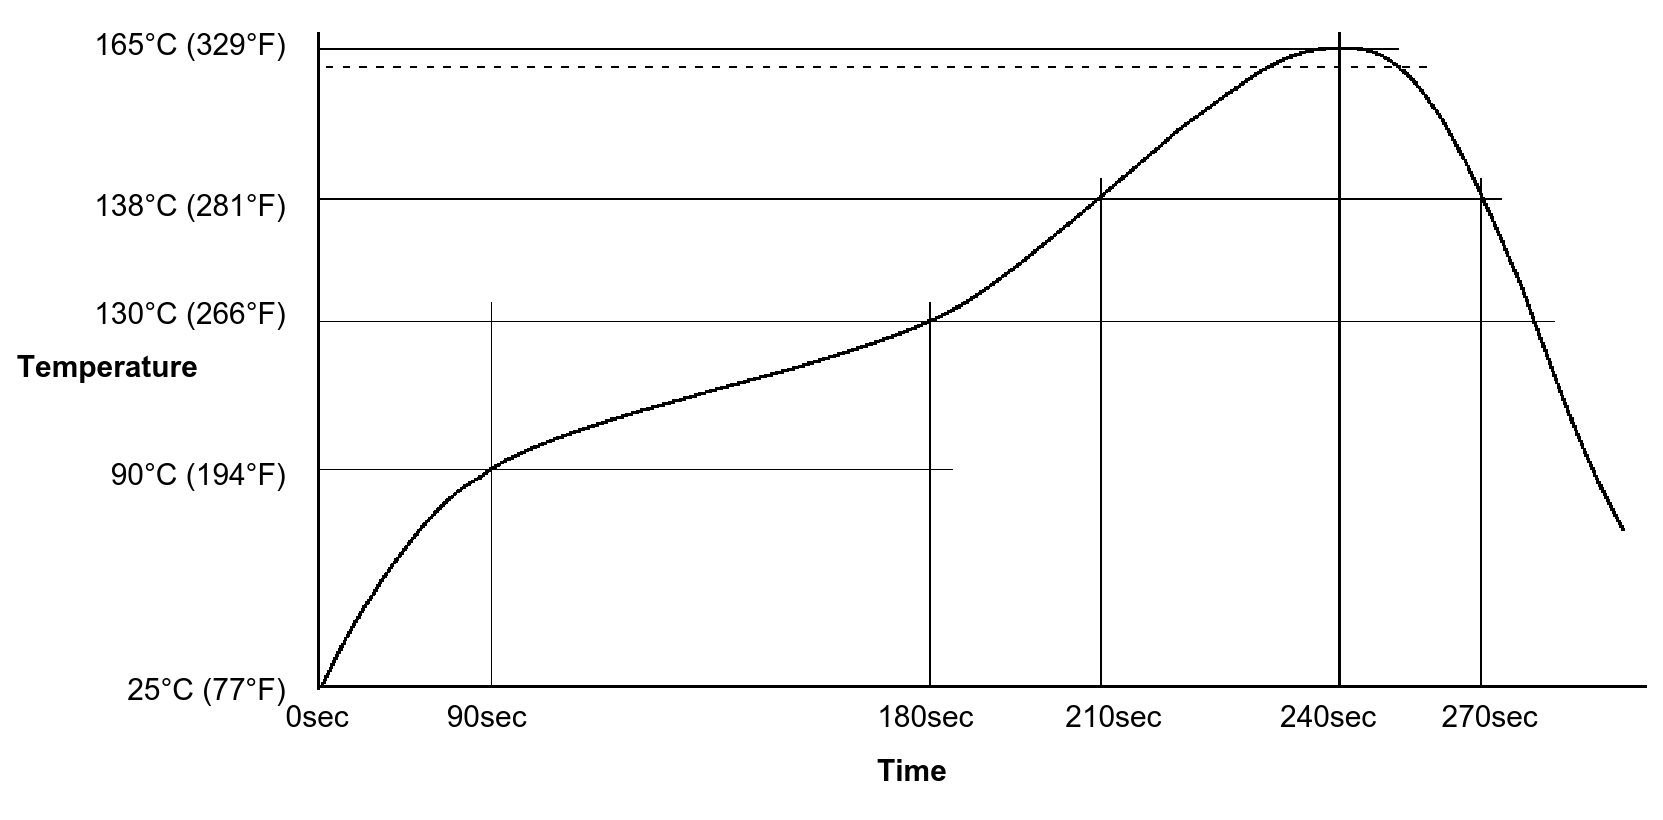 Chip Quick TS391LT reflow profile
After communicating the profile to the T-962 I applied some paste to a spare board, placed some 0603 resistors on it and let the oven do its work. The result was… disappointing.
While I had expected that some fine tuning would be needed, I had pictured to at least see some form of solder joint at the end of the baking process. What I found instead was a board with loose resistors sitting in half-molted solder paste. Something obviously went wrong. I tried tweaking the profile somewhat by extending the relflow zone and increasing the peak temperature by 5 and 10 degrees Celsius respectively. Only until I increased the temperature by 20 degrees Celsius did I end up with what looked like a solder joint.
To learn what was actually happening I decided to do some measurements by attaching a thermocouple to a board and running the reflow cycle again. An Arduino with a MAX66758 thermocouple interface helped with logging the actual temperature gradient. The Arduino sketch is simple enough to embed into this post. No need to upload it to Git repository:
|
|
This could then be logged using using the by now familiar trick: cat /dev/ttyUSB0 > temperature_log.
The graphs below show the results for some test profiles. The blue curves show the profile that was programmed into the oven. The red curves show the temperatures logged by the Arduino.
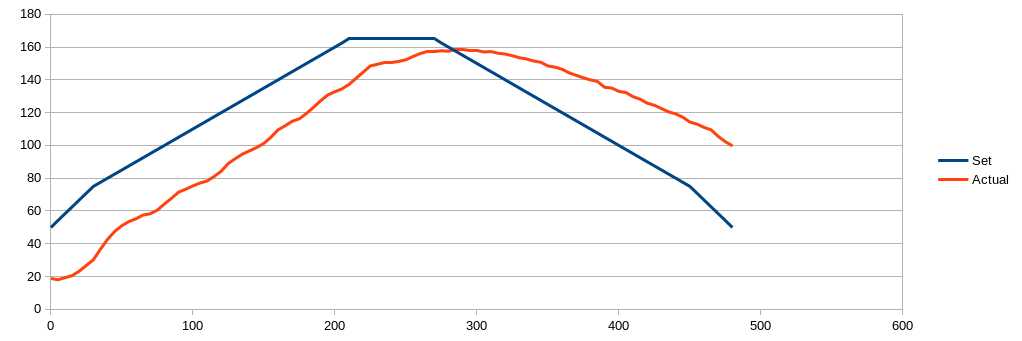
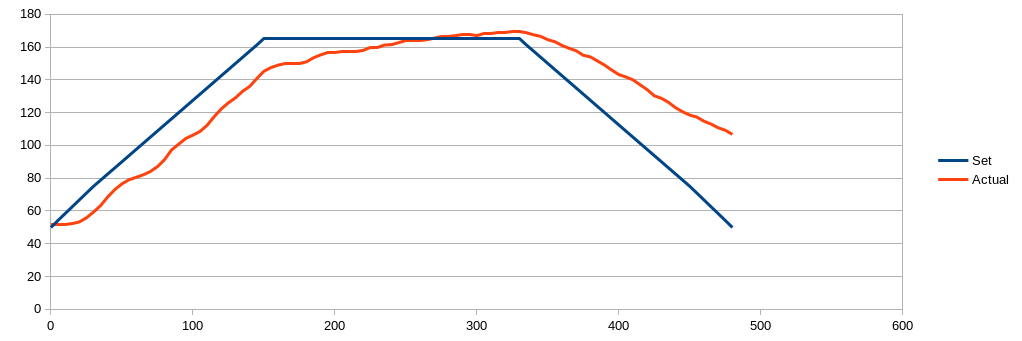
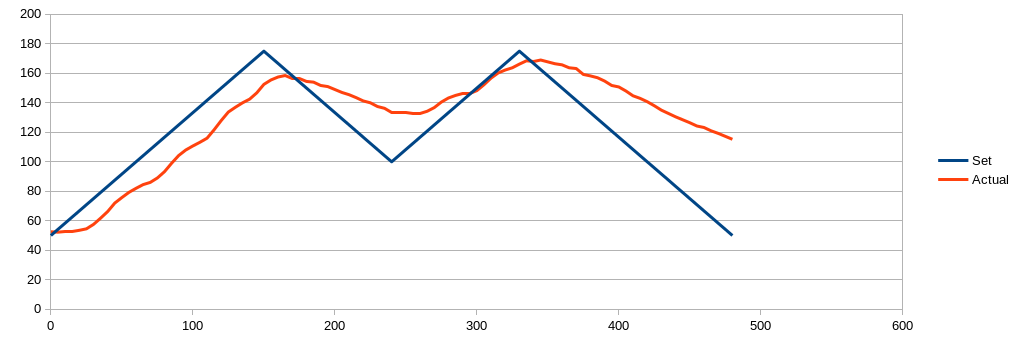
The curves show a noticeable time lag between set and actual temperatures. Also the slope of the curve during heat-up appears to be less steep than that of the programmed curve. During cool-down the difference is even greater. Both curves satisfy the the criterion for a maximum allowed slope of 3 degrees per second that Puhui specify. With the first profile the peak temperature is never reached. This explains my solder paste not melting. The seconds profile holds the temperature at a constant level for some time. In this case the temperature eventually overshoots. The initial oven temperature also seems to have effect on the total error. Profile one was executed first, when the oven was at room temperature. The latter two profiles were run after that (but with a cool down period in between).
You may be wondering: could the problem lay in the reverse engineered protocol or the way it was sent to the oven? I asked myself that same question. However, the graph on the oven LCD clearly shows the profile that was sent to it. The oven itself shows its current setpoint and the actual temperature it measures in the oven compartment. The setpoint matches the profile and according to the oven, so does the temperature gradient it creates. I would dare to draw the conclusion that the device measured its temperature incorrectly. Either due to a calibration issue or a hardware fault.
Solder by hand
… Because the oven isn’t soldering.
After I concluded that I was not going to get the oven to reflow solder reliably, I reached out to the Elektor support desk. After discussing the matter internally they kindly offered me the choice between getting a replacement unit or a refund. Because both my enthusiasm and my fate in the product had waned I decided to go for the refund.
Looks like I will have to go for the DIY solution after all. Or maybe a hot plate. Or a DIY hot plate.
I can’t deny that the experience was disappointing. Not least because I already have two boards lying around, ready to be populated. On the plus side: I did get to work out the communication protocol, played with an Arduino and learned something new in the process. So it wasn’t a complete waste of time after all.
-
Socat man page (Socat requires manual installation) ↩︎